How to use Django as an authentication provider for a Next.js application - Part 2 Published:
In Part 1 of this article series, I set up a Django project with Django OAuth Toolkit to create an OpenID Connect compliant Identity Provider. In this article I’m going to create a Next.js application as an OpenID Connect Relying Party, using the Django application as the identity provider.
tl;dr - just give me the code
If you just want to check out the code for this instead of following along, here’s the GitHub repository.
Prerequisites
- Completing Part 1 of this article series
- Node.js >= v18 (Latest LTS as of writing this is v18.16.0)
- Experience with TypeScript and Next.js
In this article I use my preferred package manager, pnpm. Adjust accordingly for yourself if you prefer npm or yarn.
Starting the Next.js project
Adjacent to the Django project folder from Part 1, create a Next.js app using create-next-app.
npx create-next-app@latest --use-pnpm webappI prefer to accept all of the defaults presented by create-next-app, so this application will use TypeScript, ESLint, Tailwind CSS, and Next.js’s new App Router.
Creating an OAuth Client in the Django Admin
The Next.js application needs to be configured as a Client Application in the Django identity provider back end. To do that, we need to create an Application and make note of the Client ID and Secret that it will generate for us.
Make sure the Django application is running, and head to the Django admin at http://localhost:8000/admin/. Log in using the credentials you created in Part 1.
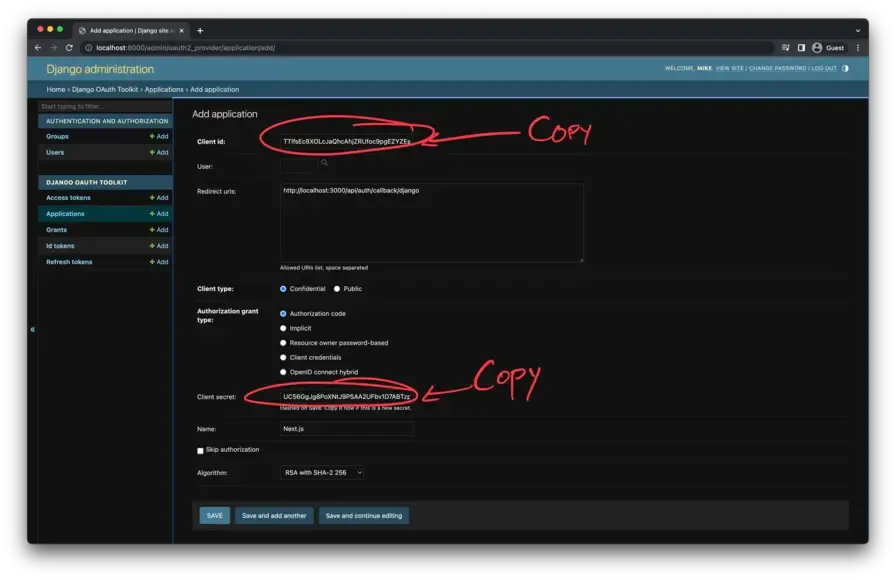
It should look something like this. Click the ”+ Add” link next to “Applications”.

When configuring the details of the OAuth Application, use the following options:
- Client ID: Use the default value. Be sure to copy it down to be used in the Next Auth configuration in the next step.
- User: Leave blank
- Redirect uris:
http://localhost:3000/api/auth/callback/django - Client type:
Confidential - Authorization grant type:
Authorization code - Client secret: Use the default value. Be sure to copy it down to be used in the Next Auth configuration in the next step. This is the last time you’ll see this value as it’s hashed on save. Don’t skip this step.
- Name: Whatever you want. I called it
Next.js. This is what users will see when asked to grant authorization to your application. - Skip authorization:
unchecked - Algorithm:
RSA with SHA-2 256
When the form looks something like this, click SAVE.
Web App environment variables
Create a .env file in the webapp/ folder and add the following values for Next Auth, substituting your own values where appropriate.
WEBAPP_CLIENT_ID=[redacted]
WEBAPP_CLIENT_SECRET=[redacted]
NEXTAUTH_URL=http://localhost:3000
NEXTAUTH_SECRET=[redacted]
Alternatively, this command will use the Node crypto lib to generate a decent value for the NEXTAUTH_SECRET environment variable and add it to the .env file.
echo NEXTAUTH_SECRET=\""`node -e "console.log(crypto.randomBytes(32).toString('hex'))"`\"" >> .envNext Auth
From the new webapp subfolder, install Next Auth.
pnpm add next-authSince this application is using the App Router, follow the directions from the Next Auth docs to set up Route Handlers in the app/ folder.
This command will create a folder called api/ inside the app/ folder, an auth/ folder inside that, and inside that, a folder called [...nextauth]/, and then create the required route.ts file.
mkdir -p app/api/auth/\[...nextauth\] && touch app/api/auth/\[...nextauth\]/route.tsInside the new route.ts file, create the necessary Next Auth configuration. This section relies heavily on the Using a custom provider section of the Next Auth docs.
import NextAuth from "next-auth";

const handler = NextAuth({
  session: {
    strategy: "jwt",
  },
  providers: [
    {
      id: "django",
      name: "Django",
      type: "oauth",
      wellKnown: "http://127.0.0.1:8000/o/.well-known/openid-configuration/",
      authorization: { params: { scope: "openid profile email" } },
      clientId: process.env.WEBAPP_CLIENT_ID,
      clientSecret: process.env.WEBAPP_CLIENT_SECRET,
      checks: ["pkce", "state"],
      async profile(profile) {
        return {
          id: profile.sub,
        };
      },
    },
  ],
});

export { handler as GET, handler as POST };
Next Auth SessionProvider
In order to make use of the useSession hook provided by Next Auth, the application needs to be wrapped in a SessionProvider component. With the Next.js Pages router, we just slapped that inside the _app.tsx file and called it a day. But with App Router, everything is a server component by default. If client-side interaction is required, a component file has to be marked with "use client" at the top of the file.
The prescribed way to handle this is to create a providers.tsx file in the app/ folder, mark it as "use client" and place the SessionProvider (and any other similar providers if you need to) inside it.
// app/providers.tsx

"use client";

import { SessionProvider } from "next-auth/react";

export default function Providers({ children }: { children: React.ReactNode }) {
  return <SessionProvider>{children}</SessionProvider>;
}
Update the root app/layout.tsx as follows.
import "./globals.css";
import { Inter } from "next/font/google";
import Providers from "./providers"; // Import the new Providers component

const inter = Inter({ subsets: ["latin"] });

export const metadata = {
  title: "Create Next App",
  description: "Generated by create next app",
};

export default function RootLayout({
  children,
}: {
  children: React.ReactNode;
}) {
  return (
    <html lang="en">
      <body className={inter.className}>
        {/* Wrap children inside the new Providers component */}
        <Providers>{children}</Providers>
      </body>
    </html>
  );
}
Gating the application with Next.js middleware
Note: At the time of writing this, there is a bug in either Next.js v13.4.4 or Next Auth v4.22.1, not sure which, but rolling back to Next v13.4.3 (from v13.4.4) seems to alleviate the problem. The issue is being tracked here in Next Auth. I’ll update the article after this issue gets resolved.
The simplest way to protect the Next.js application is by using Next Auth’s supplied middleware. This implementation follows the Basic usage pattern from the Next Auth docs.
export { default } from "next-auth/middleware";Creating a basic UserInfo component
Create a file called app/user-info.tsx. This component implements Next Auth’s useSession hook and dumps the session as stringified JSON.
// app/user-info.tsx

"use client";

import { useSession } from "next-auth/react";

export default function UserInfo() {
  const session = useSession();

  if (session.status !== "authenticated") return <></>;

  return <pre>{JSON.stringify(session, null, 2)}</pre>;
}
Web App root page
Update the app/page.tsx as follows. This will make use of the UserInfo component we just created to display the user’s session information once successfully authenticated.
import UserInfo from "./user-info";

export default function Home() {
  return <UserInfo />;
}
Let’s fire it up!
With the above in place, start the Next.js development server.
pnpm devAnd of course the Django development server, too.
python manage.py runserverOpen http://localhost:3000 in a browser. It should redirect you to the generated Next Auth sign-in page that looks something like this if everything is correct.
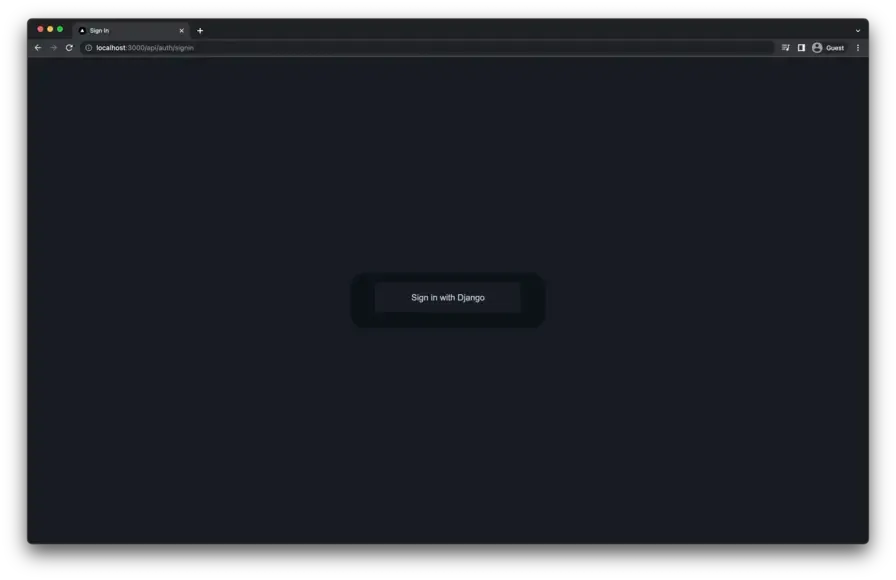
Clicking the “Sign in with Django” button will redirect the user to the Django login screen with some added state variables in the URL query string.
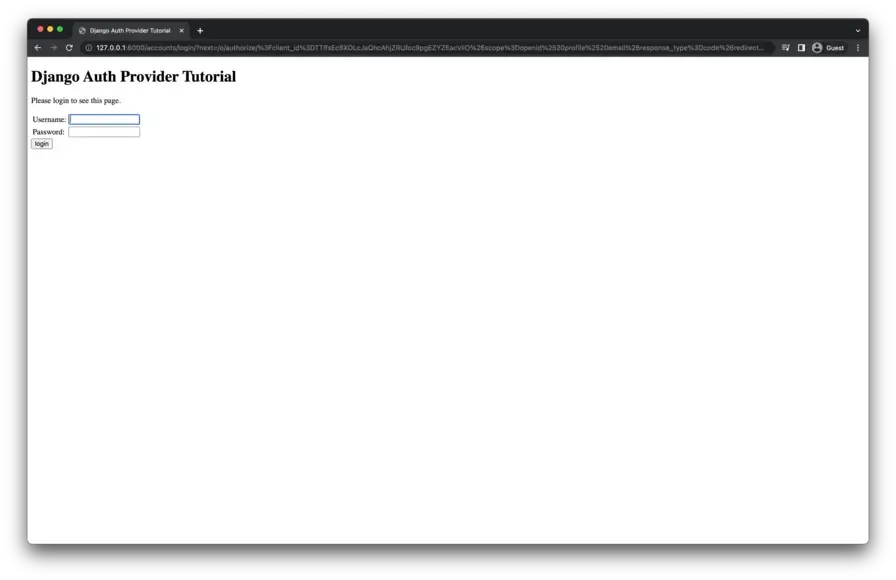
Authenticate with the credentials created in Part 1 of this article series. Upon successful authentication, the user is presented with Django OAuth Toolkit’s default app authorization screen. Click “Authorize” to proceed.

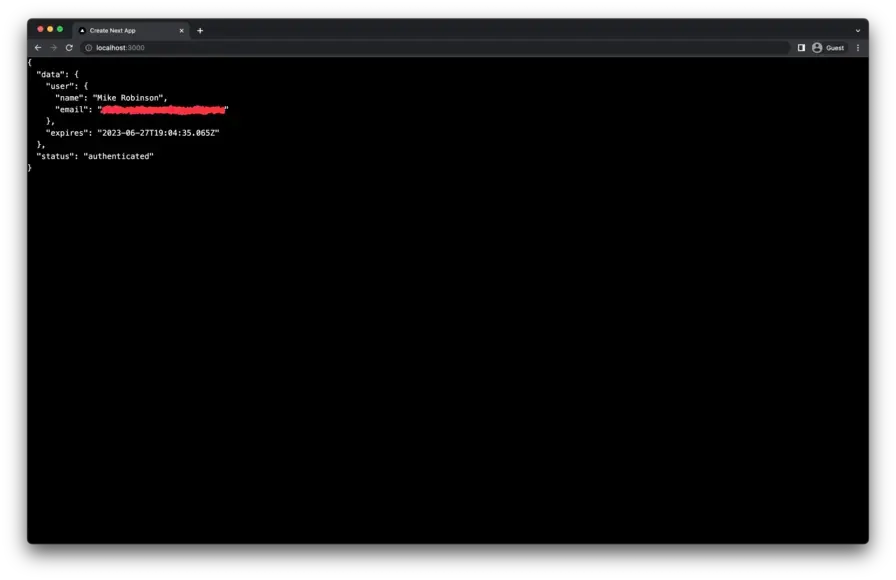
Upon successful authentication, the user should be redirected back to the Next.js application. The Next.js app should then be able to retrieve user information from the session.
Note: If you’re seeing an empty string for the user’s
namefield, update the user info in the Django admin, sign out of the Next.js app, and sign back in again.
If everything went smoothly, this should be the end result.
Summary
That’s a wrap on configuring a Django-based OpenID Connect provider and a Next.js Relying party application! If you made it this far, thank you so much for reading (and maybe even sharing) this article series.
I plan to write a Part 3 where I integrate Django Rest Framework and send an access token that can be used to fetch data from the Django API in the Next.js application. Stay tuned for that.
Discussion
I’m using GitHub Discussions on the tutorial repository as a place to talk about this article series. Hit me up there if you have any questions or comments. I’ll try to respond as soon as I can.